
Tracking who paid and who didn't is one of the most tedious parts of tutoring. Spreadsheets get outdated, mental notes get lost, and awkward "did you pay?" conversations are never fun.
TeachersFlow handles payment tracking automatically. Here's how.
The Big Picture
Every student in TeachersFlow has a balance — a running total of how much credit they have. The flow is simple:
- Student pays → balance goes up
- Lesson happens → balance goes down (if auto-charge is on)
- You always know exactly where things stand
No spreadsheets. No manual math. The balance updates itself.
Auto-Charge: Set It and Forget It
Auto-charge is the feature most tutors love — full mechanics in Auto-Charge: How Automatic Balance Deduction Works. When enabled for a student, here's what happens:
- A scheduled lesson's time passes
- TeachersFlow automatically marks it as completed
- The lesson price is deducted from the student's balance
- A "Lesson" entry appears in the balance history
You don't do anything. It just works.
To enable or disable auto-charge: Open a student's profile → toggle Auto-charge on or off. It's on by default.
Some tutors prefer manual control — that's fine. Turn off auto-charge, and you'll need to record balance changes yourself.
Recording a Payment
When a student pays you (bank transfer, cash, card — however you handle it), record it in TeachersFlow:
- Go to Payments in the main navigation
- Click Add payment (the first row in the table)
- Select the student (or group)
- Enter the number of lessons they're paying for
- The amount calculates automatically based on the lesson price
- Click Save
The payment is recorded as confirmed immediately, and the student's balance increases.
You'll see the student's current balance and lesson price right in the form — so you know exactly what to expect.
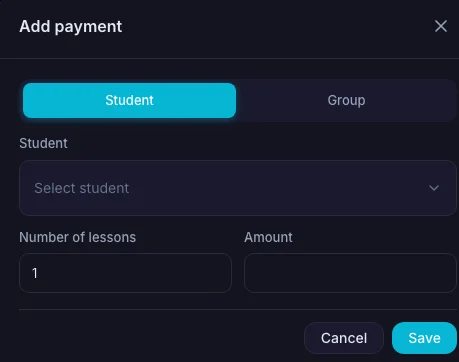
Group Payments
Switch to the Group tab in the payment form. Select a group, enter the number of lessons — the payment applies to every student in the group at once.
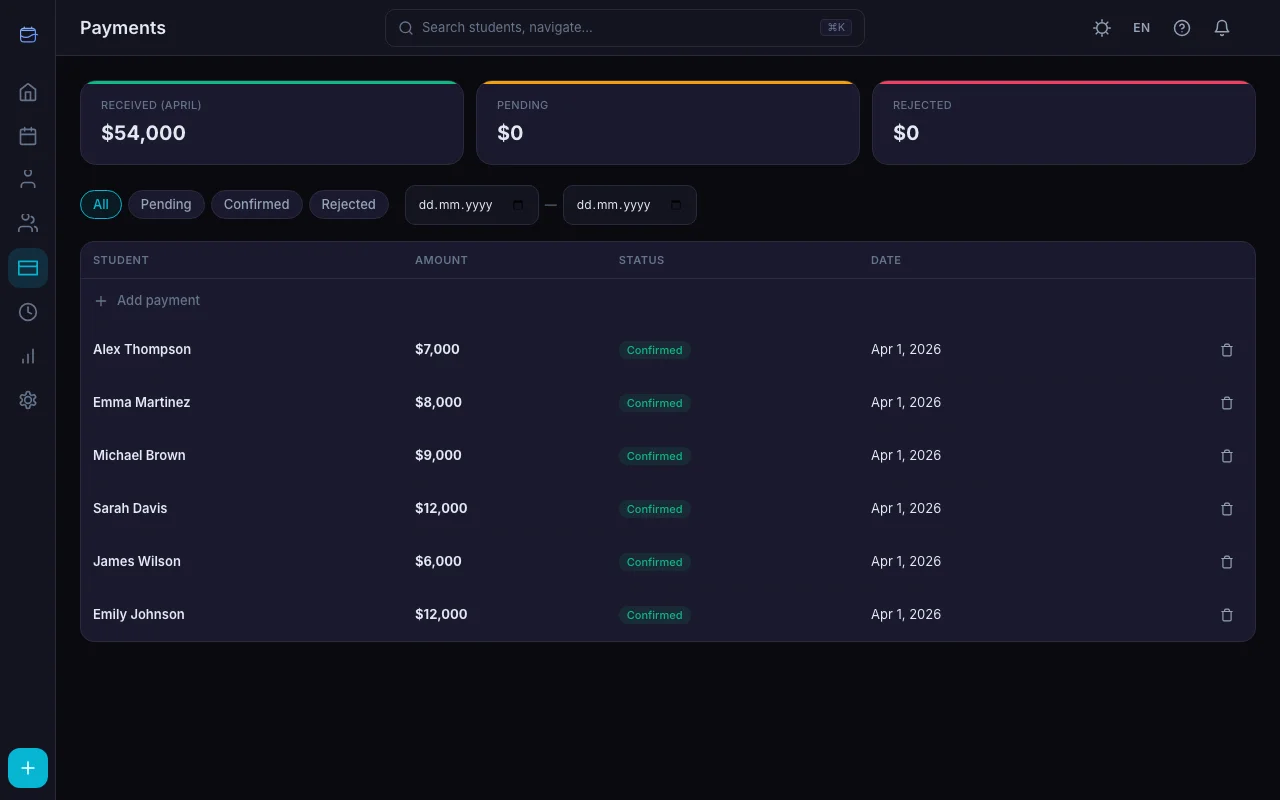
The Payments Page
The Payments page gives you a full overview:
Summary cards at the top: - Received — total confirmed payments this month - Pending — payments awaiting confirmation - Rejected — declined payment requests
The payment table shows every payment with: - Student name - Amount - Status (Pending / Confirmed / Rejected) - Date - Action buttons (confirm, reject, delete)
Filters: - By status — see only pending, confirmed, or rejected - By date range — narrow down to a specific period
How Students Pay Through the Portal
If a student is registered in the student portal, they can submit payments themselves — and you can also send a payment request or automate payment reminders when they forget:
- Student opens their portal → Payments tab
- Clicks Submit payment
- Enters the number of lessons
- Clicks Submit
This creates a payment with status "Awaiting confirmation." You get a notification and can confirm or reject it from the Payments page.
The actual money transfer happens outside TeachersFlow (bank transfer, cash, Venmo — whatever you agree on). The portal just tracks the record.
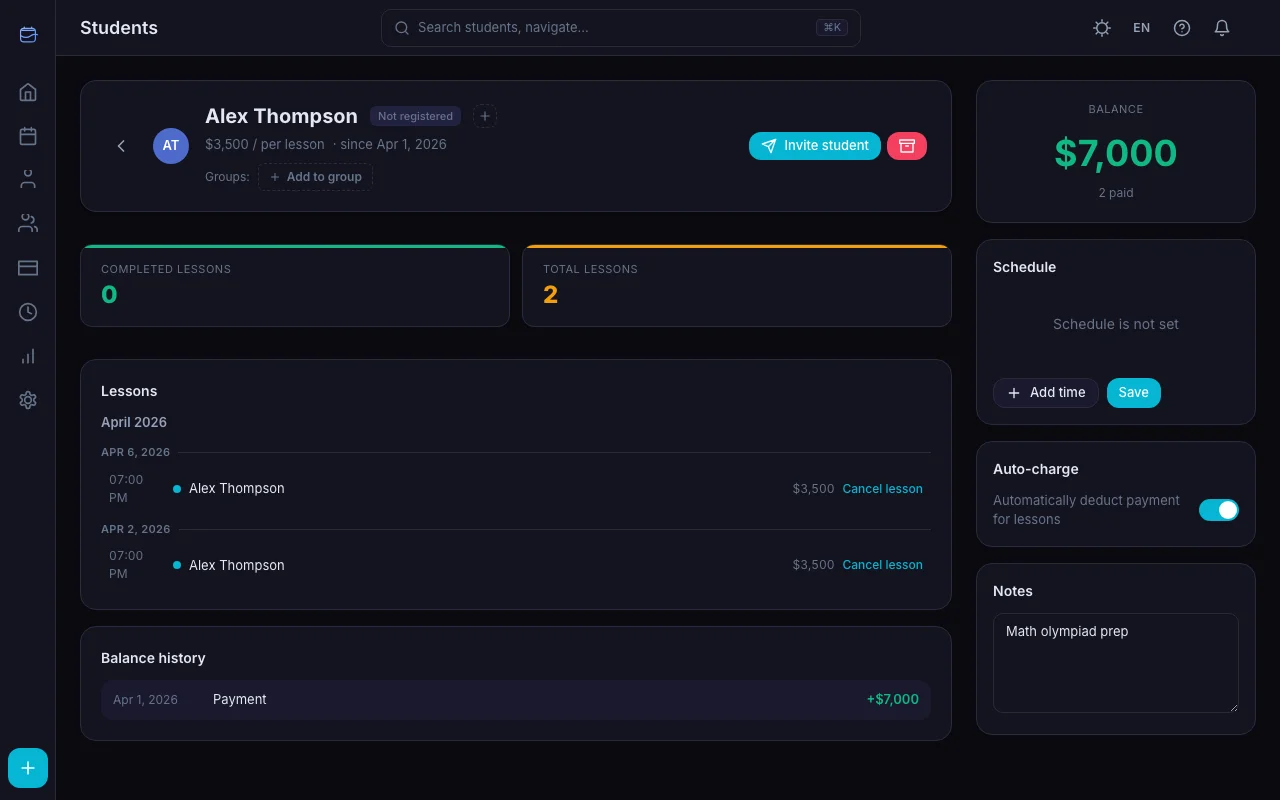
Balance at a Glance
Every student's balance is visible in multiple places:
- Student profile — large balance card at the top, with Paid lessons, Completed lessons, and Lesson price
- Student list — each card shows the current balance
- Payment form — current balance appears when you select a student
- Student portal — the student sees their own balance
The balance color tells you everything: green means the student has credit, red means they owe you.
Editing Balance Manually
Sometimes you need to adjust a balance — a refund, a correction, a special deal. Click the balance number on the student's profile page, enter the new value, and save. A "Manual adjustment" entry appears in the balance history.
Balance History
Open a student's profile → Balance tab. Every single change is logged:
| Entry Type | What Happened |
|---|---|
| Lesson | Balance decreased because a lesson was completed |
| Lesson cancellation | Balance restored because a lesson was cancelled |
| Payment | Balance increased from a confirmed payment |
| Top-up | Student submitted a payment through their portal |
| Manual adjustment | You edited the balance directly |
| Payment deleted | A previously confirmed payment was deleted (balance reversed) |
It's a complete audit trail. No more "where did that money go?" moments.
Payment Statuses Explained
| Status | What It Means |
|---|---|
| Pending | Payment awaiting confirmation (created by the system or marked as paid by the student) |
| Confirmed | Teacher verified — balance updated |
| Rejected | Teacher declined the payment |
16 Currencies
TeachersFlow supports 16 currencies: USD, EUR, GBP, GEL, RUB, UAH, KZT, BYN, TRY, ILS, PLN, CZK, JPY, CNY, INR, BRL.
Set your currency in account settings — all amounts display in that currency across the entire app, including the student portal.
Try It Now
Open TeachersFlow, add a student with a lesson price, and record your first payment. The balance updates instantly — and you'll never wonder "did they pay?" again. Curious how the numbers add up across months? See Revenue Analytics in TeachersFlow.
14 days of full Pro access — no card required.